![]() As promised in my previous article, this article contains awesome example GP Power Tools – Developer Tools projects for tracking changes to customer and vendor cards records.
As promised in my previous article, this article contains awesome example GP Power Tools – Developer Tools projects for tracking changes to customer and vendor cards records.
Thanks to Eric Gernan from Amaysim Mobile whom I worked with to create this custom functionality and gave me permission to publish generic versions of the projects.
The two custom projects (download links below) use the same design with one working for Customer data and the other working for Vendor data. They work by registering triggers just before the save event runs to compare the window data when the user saves a record to the pre save table data to identify differences and then log changes for the specified fields including the old and new values to a custom SQL table added to the system database.
[Edit] Version 4 of the Customer and Vendor Change Tracking is now available:
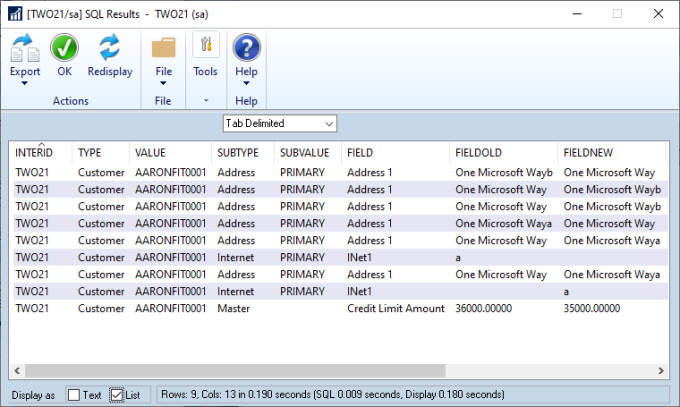
The projects also add a “Display Change History” menu option to the main window’s Additional menu which will open the SQL Results window with the logged changes for the current record.
If you want the change history can be exported as tab or comma delimited and saved as a file or emailed using the Export button.
Before using the projects
After you have loaded one or both of the projects, make sure open and execute the Table Creation SQL Script in each project to create the SQL table used for logging. There are separate tables used for customer change tracking and vendor change tracking. It would be possible to use the same table, but it was simpler to keep the projects completely independent.
Customer Change Tracking Project
The windows tracked for customers/debtors are:
- Customer Maintenance (RM_Customer_Maintenance)
- Customer Address Maintenance (RM_Customer_Address)
- Internet Information (coINetAddrsEntry) Customer data
The fields are defined using string variables containing a comma separated list of fields using their Dexterity Technical Names.
Fields_Master = "Customer Name, Short Name, Statement Name, Inactive, Customer Class, Address Code,";
Fields_Address = "Contact Person, Address 1, Address 2, Address 3, City, State, Zip, Phone 1,";
Fields_Options = "Currency ID, Tax Registration Number, Credit Limit Amount,";
Fields_Internet = "Email To Address, Email Cc Address, Email Bcc Address, INet1,";
Vendor Change Tracking Project
The windows tracked for vendors/creditors are:
- Vendor Maintenance (PM_Vendor_Maintenance)
- Vendor Address Maintenance (PM_Vendor_Address)
- Internet Information (coINetAddrsEntry) Vendor data
The fields are defined using string variables containing a comma separated list of fields using their Dexterity Technical Names.
Fields_Master = "Vendor Name, Vendor Short Name, Vendor Check Name, Vendor Status, Vendor Class ID, Vendor Address Code - Primary,";
Fields_Address = "Vendor Contact, Address 1, Address 2, Address 3, City, State, Zip Code, Phone Number 1,";
Fields_Options = "Currency ID, Tax Registration Number, Credit Limit Dollar,";
Fields_Internet = "Email To Address, Email Cc Address, Email Bcc Address, INet1,";
Changing the tracked fields
To change the tracked fields, just edit the variable definitions containing the field lists of Dexterity Field Technical Names in the triggers 1 to 3. Make sure you leave the final comma at the end of the string variable.
- If you wish to change the fields for the Master part of the data, change the Fields_Master in trigger 1.
- If you wish to change the fields for the Address part of the data, change the Fields_Address in trigger 1 and 2.
- If you wish to change the fields for the Options part of the data, change the Fields_Options in trigger 1.
- If you wish to change the fields for the Internet Information part of the data, change the Fields_Internet in trigger 3.
Note: An easy way to identify the field technical names is to open the Resource Information window in Form, Window and Field mode with the Show currently selected Window and Field information option checked. Then just open the window in question and click on the field to see the Field Technical Names. Make sure you don’t include the single quotes when you add field to the field list.
Downloading and Installing
Download the example code, import using the Project Setup window (now possible for first time imports with Build 28.8 onwards), or use Configuration Export/Import window (for older builds):
The code will be active on next login or after switching companies, or you can use start the triggers manually from the Project Setup window.
More Information
For more information see:
- #GPPT Tracking changes to Customer and Vendor Cards Version 4
- #GPPT Tracking changes to Customer and Vendor Cards Version 3
- #GPPT Tracking changes to Customer and Vendor Cards Version 2
- #GPPT Tracking changes to Customer and Vendor Cards
- #GPPT Using GP Power Tools to track specific changes
- #GPPT Using GP Power Tools to track specific changes Revisited
- GP Power Tools Portal: http://winthropdc.com/GPPT
- GP Power Tools Samples: http://winthropdc.com/GPPT/Samples
- GP Power Tools Videos: http://winthropdc.com/GPPT/Videos
David
15-Jul-2022: Updated projects to Version 2 code.
02-May-2023: Updated projects to Version 3 code.
17-Jan-2024: Updated projects to Version 4 code.
This article was originally posted on http://www.winthropdc.com/blog.


8 thoughts on “#GPPT Tracking changes to Customer and Vendor Cards”