
![]() Here is a quick project that can make using Microsoft Dynamics GP much easier for your users. We are going to use GP Power Tools along with the free menu module of Visual Studio Integration Toolkit to add windows to the application level navigation menus.
Here is a quick project that can make using Microsoft Dynamics GP much easier for your users. We are going to use GP Power Tools along with the free menu module of Visual Studio Integration Toolkit to add windows to the application level navigation menus.
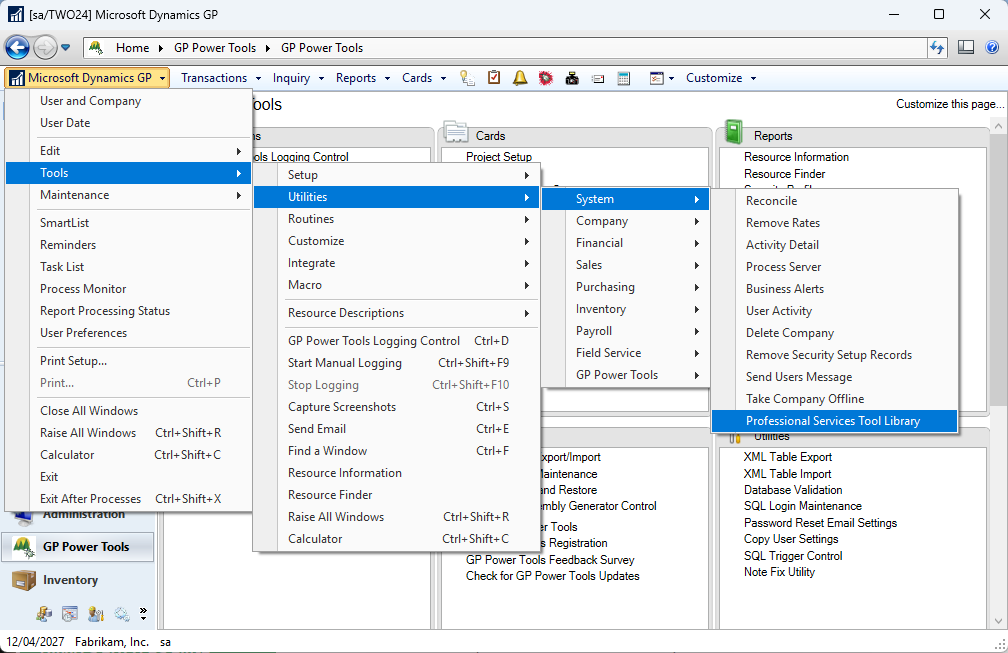
For our example we are going to use the Professional Services Tools Library and add a menu to the main window of the product as well as the Receivables Transaction Unapply window.
[Edit] We are also going to add the Item Reconciler window as that requires some different techniques.
Below are the instructions to create this project. You can use the techniques described here to add any window to the application level navigation menus.
Preparation
You will need GP Power Tools installed with the Developer Tools module registered. Having the Administrator Tools module as well will speed up development as we can use the Resource Information window.
You will also need Visual Studio Integration Toolkit installed and the free modules registered.
As we are adding menus for windows in Professional Services Tools Library, you will need that product installed if you wanted to import the project attached to this article. You can use the same techniques for windows in any other product.
Create a Project
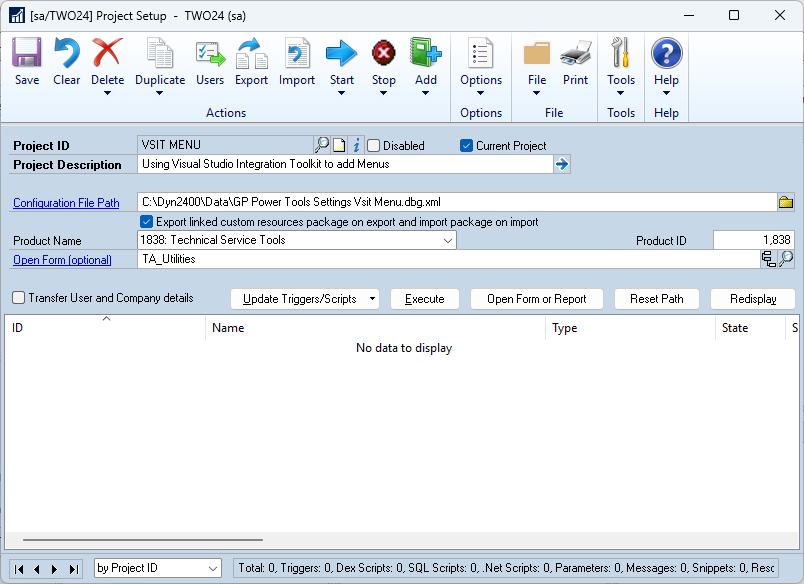
From the GP Power Tools area page, select Cards >> Project Setup. Enter the Project ID: VSIT MENU and Project Description: Using Visual Studio Integration Toolkit to add menus. Check the Current Project checkbox so that the Project Setup window will open straight to this project.
Optional: You can select a default window that is handy for testing. I selected the main PSTL window, which is TA_Utilities in the 1838: Technical Service Tools dictionary.
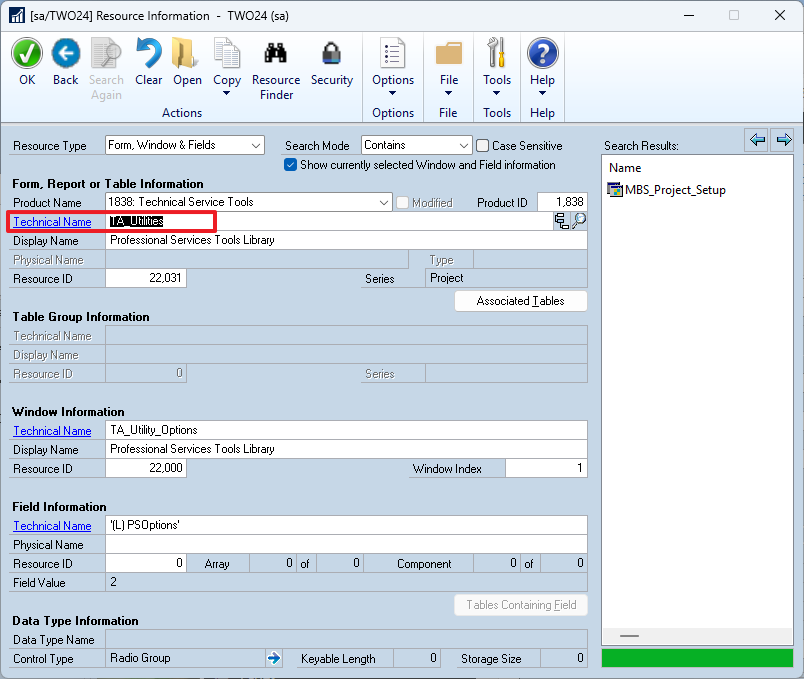
If you have Administrator Tools registered: To make the next steps easier, from the Tools menu on the Project Setup window, select Resource Information and make sure it is in Form, Window & Field mode with the Show Currently Selected checkbox enabled.
Add a Trigger for each Menu
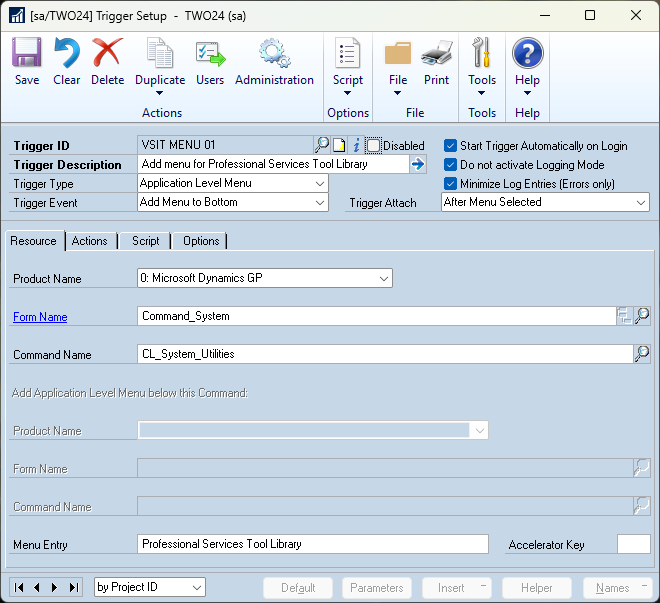
From the Project Setup window, select Add >> Trigger Setup to open the Trigger Setup window. Enter the Trigger ID: VSIT MENU 01, and Trigger Description: Add menu for Professional Services Tool Library. Check the Start Trigger Automatically checkbox. Then select Trigger Type: Application Level Menu, Trigger Event: Add Menu to Bottom, and Trigger Attach: After Menu Selected.
On the Resource Tab use the Form Name Lookup to select where you want the menu located. On the Menu Explorer window you can select via the menu navigation or the area page navigation.
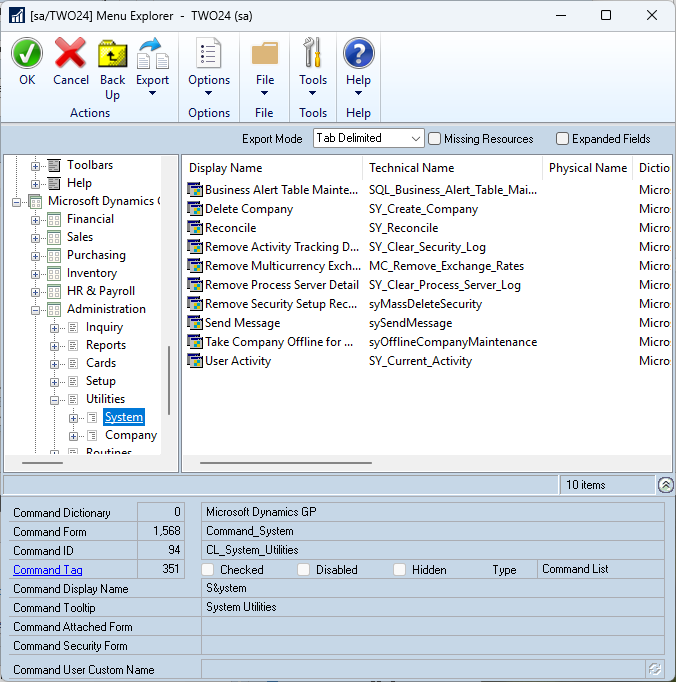
Once you have found the menu (System >> Utilities), click OK. Then enter the wording you wish to see on the menus, use the Menu Entry: Professional Services Tool Library. You can also enter an optional Accelerator Key which can be used with the Control key to select the menu via a keyboard shortcut.
If you have the Resource Information window open, just navigate to the window you want to open. In this case we can click on the Open Form hyperlink on the Project Setup window to open the PSTL main window. Resource Information will show the Dictionary and Form Technical Name of the window just opened.
Now on the Trigger Setup window, click on the Script Tab to edit the script to make it open the window. Set the Script Dictionary Context to the product dictionary and then inside the if statement, add the command “open form” and copy and paste the name in and add an ending semicolon.
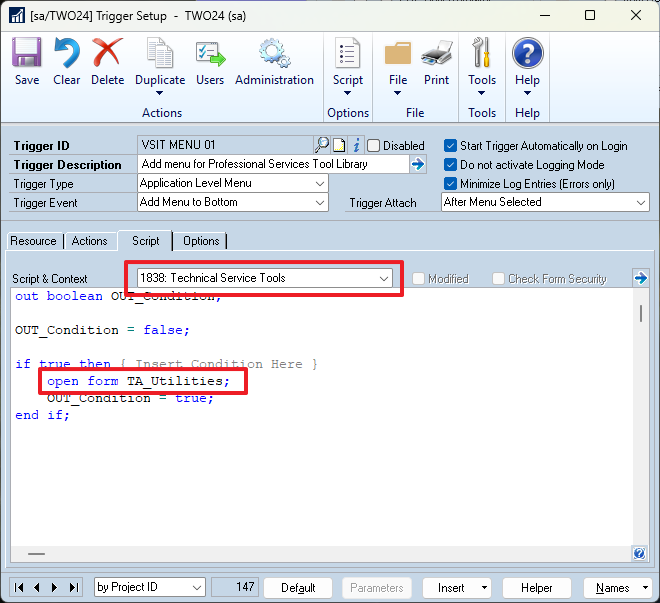
Note: You can change the Trigger Event if you want to place the menu in a different position.
Click Save to save the trigger.
Repeat this process for Trigger ID: VSIT MENU 02, and Trigger Description: Add menu for Receivables Transaction Unapply to add to the TA_Transaction_Unapply form to the Sales >> Transaction menu.
Additional Techniques
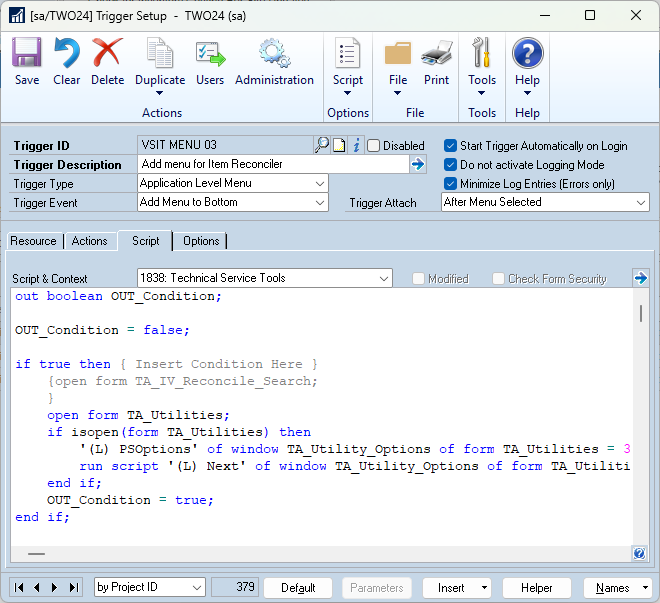
[Edit] Repeat this process again for Trigger ID: VSIT MENU 03, and Trigger Description: Add menu for Item Reconciler to add to the TA_IV_Reconcile_Search form to the Inventory >> Utilities menu.
However, when you use this menu option we are shown the error message:
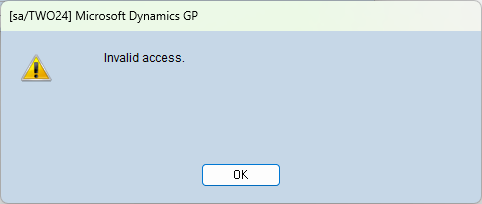
Capturing logs and looking at the script log shows the window is opened with a call to the TAOPEN global procedure. Replicating this call also gives the same error. So, it seems there is some other business logic that means the window can only be opened from the main Professional Services Tools Library (TA_Utilities) form.
As we need to open the main PSTL window, but don’t want the user to see it open and close, we are going to use a script to automatically close the window when it has been opened as hidden and a trigger to look at a Memory Parameter to decide if the main PSTL window should be hidden when the window opens. If opening hidden, the trigger will call the script “delayed” so that the window closes.
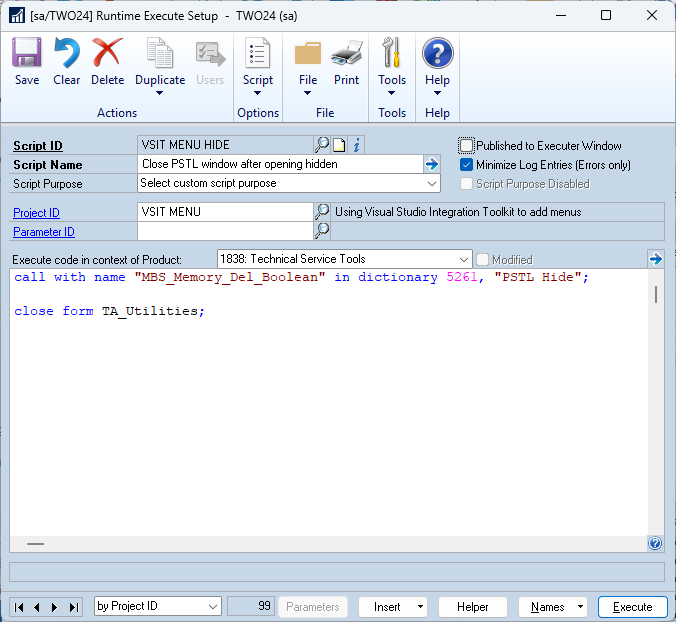
From the Project Setup window, select Add >> Runtime Execute Setup to open the Runtime Execute Setup window. Enter the Script ID: VSIT MENU HIDE, and Script Name: Close PSTL window after opening hidden. Change the Execute code in context of Product: to 1838: Technical Service Tools.
In the Script add the call to get the memory parameter. Using the Helper Button, insert the Helper Function >> Working with Parameters (Memory based) >> Delete a memory parameter value of Datatype Boolean. Change the “Variable” name to “PSTL Hide”, it can be anything as long as you are consistent. Then add the command close form TA_Utilities;
Click Save and close the window. Now we need a trigger to hide the window and call the script depending on the value of the Memory Parameter.
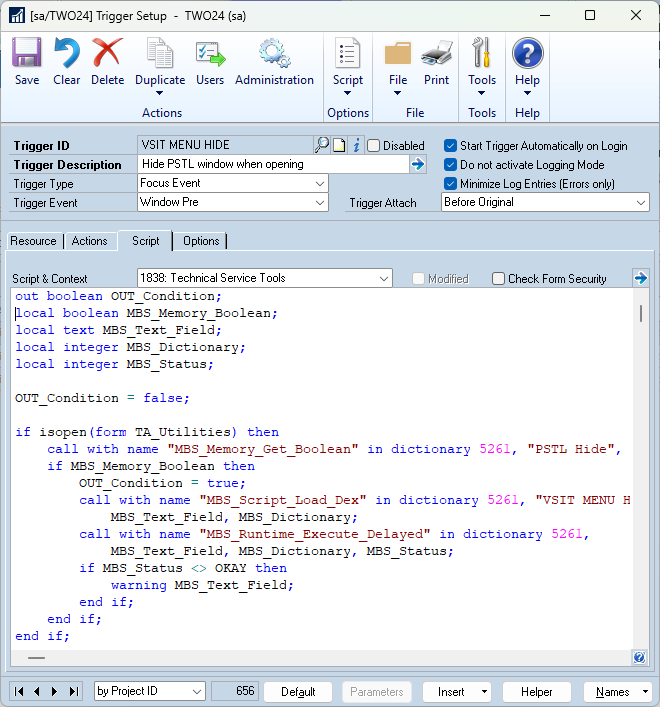
From the Project Setup window, select Add >> Trigger Setup to open the Trigger Setup window. Enter the Trigger ID: VSIT MENU HIDE, and Trigger Description: Hide PSTL window when opening. Check the Start Trigger Automatically checkbox. Then select Trigger Type: Focus Event, Trigger Event: Window Pre, and Trigger Attach: Before Original.
On the Resource Tab, use the lookup to select Product Name: 1838: Technical Service Tools, and under Project Series Form Name: TA_Utilities, Window Name: TA_Utility_Options.
On the Actions Tab, select the Open Window Hidden option. Finally, on the Script Tab, edit the default script. Inside the if isopen() statement, add the call to get the memory parameter. Using the Helper Button, insert the Helper Function >> Working with Parameters (Memory based) >> Get a memory parameter value of Datatype Boolean. Change the “Variable” name to “PSTL Hide”. Then wrap the OUT_Condition = true inside an if MBS_Memory_Boolean then statement. This way, if the memory parameter is set to true, the Actions (hiding the window) will occur.
To get the window to close, we will use the Helper Button, and select Helper Function >> Working with Scripts >> Execute Runtime Execute Script ID. Select the Script ID: VSIT MENU HIDE and check the Call Script Delayed option.
Click Save to save the trigger.
Now we can edit the script in the VSIT MENU 03 trigger to change how the window is opened. Instead of opening the TA_IV_Reconcile_Search form directly, we will now open the main PSTL window (form TA_Utilities) and select the 31st option and click the Next Button.
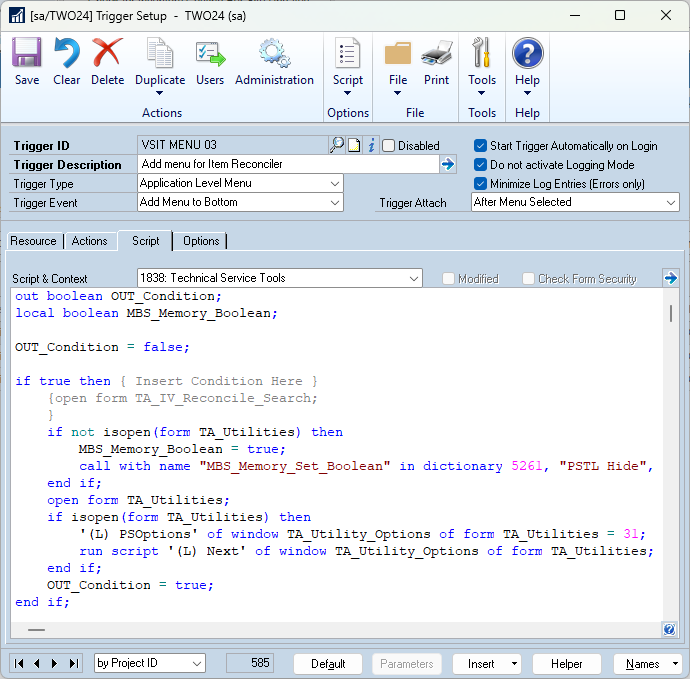
Once this is tested and proven to work, the last change to the script is to set the Memory Parameter to hide the window if it is not currently open.
Inside an if not isopen() statement, add the call to get the memory parameter. Using the Helper Button, insert the Helper Function >> Working with Parameters (Memory based) >> Set a memory parameter value of Datatype Boolean. Change the “Variable” name to “PSTL Hide”. Set the MBS_Memory_Boolean value to true.
Click Save to save the changes. These changes will now allow the Item Reconciler window to be opened directly (as far as the end users are concerned), but it is actually opening via the main PSTL window (which has been hidden).
Access to the windows
To test, on the Project Setup window select Start >> Project Triggers or log into Dynamics GP again. Then the new menu entries should be accessible via the menus or the Area Pages.
You might need to modify Security Task, Security Role and User Security settings to grant access to the window. This will control who can access the windows, but not who can see the menus.
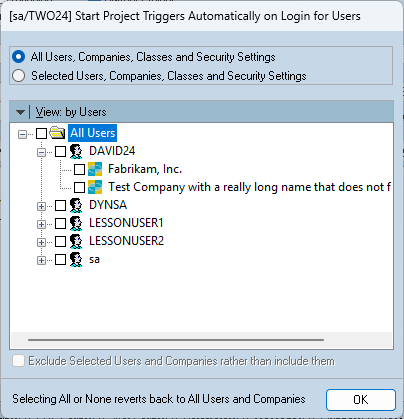
If you want to control who see the menus, on the Project Setup window, click the User Button and use the window to select which Users and/or Companies have access or click on the View by button to select by User Class, Modified Alternate ID, Security Role or Security Task.
Hint: If you use the same Security Task used to control the access to the windows, then only the users who have access will see the menus.
Troubleshooting
If the menus fail to appear and the GPPTools*.log returns an Error -17 meaning that VSIT is not registered yet, you might need to use Dictionary Control to move Visual Studio Integration Toolkit above GP Power Tools in the Dynamics.set launch file. If this is required, you can create a rule to automate this change using Launch File Configuration.
This timing issue has been fixed in GP Power Tools Build 30.2, Last Modified: 19-Feb-2024. No need to move products in the launch file.
Downloading and Installing
Download the example code, import using the Project Setup window (now possible for first time imports with Build 28.8 onwards), or use Configuration Export/Import window (for older builds):
The code will be active on next login or after switching companies, or you can start the triggers manually from the Project Setup window.
More Information
For more information see:
- GP Power Tools Portal: http://winthropdc.com/GPPT
- GP Power Tools Samples: http://winthropdc.com/GPPT/Samples
- GP Power Tools Videos: http://winthropdc.com/GPPT/Videos
- Visual Studio Integration Toolkit Portal: https://winthropdc.com/VSIT
Hope you the technique demonstrated in this article helpful.
David
19-Feb-2024: Timing issue with product order between GP Power Tools and Visual Studio Integration Toolkit resolved.
07-Mar-2024: Added method for opening Item Reconciler via the main PSTL window.
This article was originally posted on http://www.winthropdc.com/blog.

How to change the font size in GP with GP Power Tools
LikeLike
Hi Lesia. Please see this article: https://winthropdc.wordpress.com/2016/11/08/gppt-using-microsoft-dynamics-gp-with-high-dpi-on-high-resolution-monitors/
LikeLike
Hi, Thanks for the link. I am not very good with the font information.
Is there a video that would walk me through the process?
Thanks Lesia
LikeLike
Hi Lesia
The article has the steps to change the settings inside GP Power Tools, but since build 29 just installing GP Power Tools will fix the issue.
Kind regards
David
LikeLike