
![]() The Robocup Junior WA State Competition for 2019 is just around the corner, so I thought I would get back to writing some more of the blogs in this series.
The Robocup Junior WA State Competition for 2019 is just around the corner, so I thought I would get back to writing some more of the blogs in this series.
So far we have concentrated on building and programming of a Line Following Robot, but we have not discussed the handling of intersections or shortcuts. These are the green squares which indicate the direction a robot should turn when it reaches an intersection.
This article will be broken into two sections, the first section will discuss how to detect an intersection and the second section covers how to navigate an intersection.
Please note that all of the methods below are assuming that the robot has two colour sensors, one on each side of the line. A single sensor robot will not be able to handle intersection markers well.
Detecting an Intersection
Detecting an intersection can be handled in different ways and mainly depends on how the line following is being performed.
- If using colour mode for line following (which is not recommended), you can look for green*. The issue is that when line following in colour mode, the sensor will sometimes give false green readings when it is half on the line.
- If using brightness or light mode, you can look for double black. Once a double black is seen you can back up a little and switch to colour mode to detect the green* squares.
- If using RGB mode, you can look for green* squares as you drive over them without needing to first see the double black.
Note: The asterisks after green* are because detecting green is not just as simple as seeing green on a colour sensor. See the What is Green? section below for more information.
When you detect an intersection marker on the left or right, it is a good idea to get the robot to play a sound file and say Left or Right. This will help you debug the code by knowing that the robot has successfully seen the intersection marker and has decided which direction it needs to turn.
If using EV3 Basic, you can using the Speaker.Play() function to play the sound file, don’t include the .rsf extension when passing the path to the sound file. You will need to manually copy the sound files to your robot using the EV3 Explorer before they can be used. The standard EV3 sound files can be located in the folder and its subfolders (Left and Right are in the Information subfolder):
C:\Program Files (x86)\LEGO Software\LEGO MINDSTORMS EV3 Home Edition\Resources\BrickResources\Retail\Sounds\files\
Navigating an Intersection
To navigate the intersection, you will want your robot to turn in the desired direction and finish with its sensors either side of the line, so that it can just go back to the line following code. The exact number of degrees to move or turn depends on your robot and is best worked out with a little “trial and error”.
I suggest using a Timer block or Program.Delay() function to pause between each step so you can ensure the robot is in the correct position before the next step. Remove the pauses once the code is working.
The following steps and diagrams show how to navigate an intersection marker successfully. They are based on the first intersection of the standard “Gridlock” tile.
Note: If detecting green first and not looking for double black, start from step 3.

Step 1: Line follow until you see double black, then stop
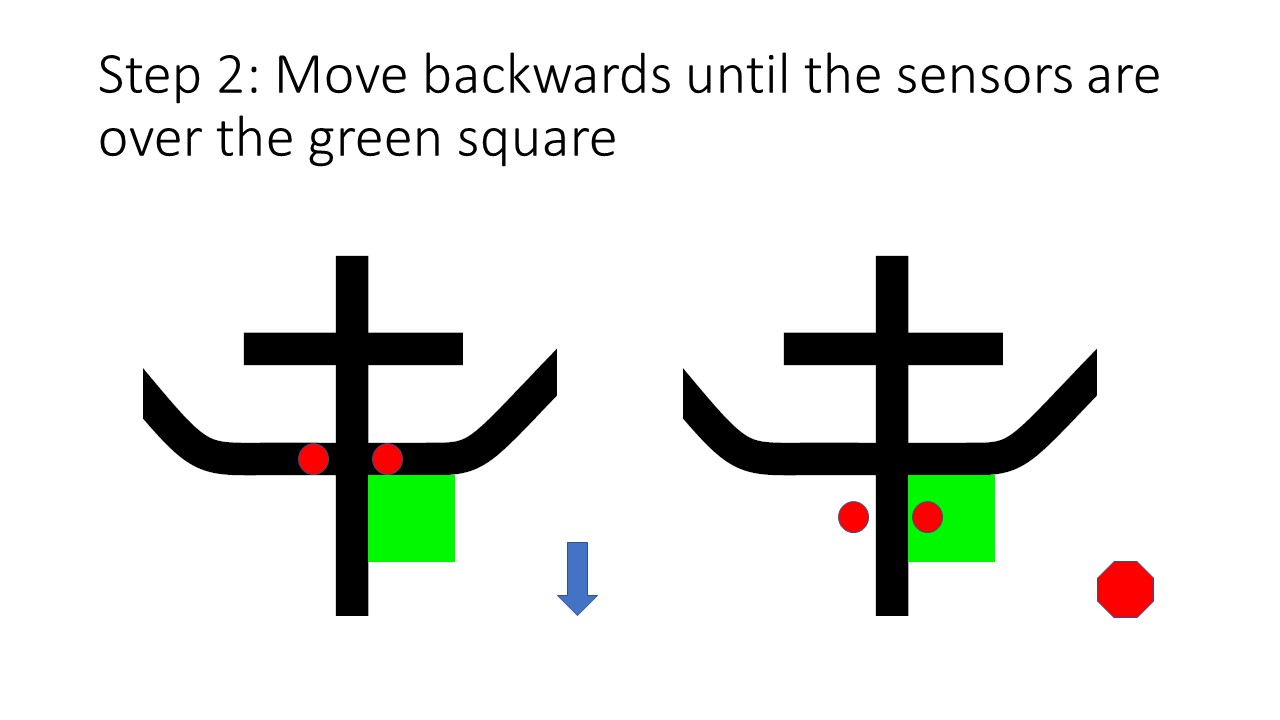
Step 2: Move backwards until the sensors are over the green square

Step 3: Detect if the green square is on the left or the right and play a sound

Step 4: Move a small distance forward before starting your turn

Step 5: Turn a fixed distance to ensure the outside sensor has passed the black lines

Step 6: Continue turning until the outside sensor sees the line

Step 7: Make sure the turn moves forward a little as it turns so you are past the green

Step 8: Stop turning and return to the line following code
Note: If using the double black method and no green square is detected, move forward a distance that will make sure your sensors are in front of the double black before returning to the line following code.
What is Green?
Detecting the green of the intersection or shortcut marker is not as straight forward as you might think. The Lego NXT colour sensor is very good at picking up a range of green shades, however the Lego EV3 colour sensor is really only good at detecting Lego green (as used by Lego for their green blocks). When looking at other shades of green the sensor has been known to report black or even white. It can depend on the height of the sensor and the quality of the printing of the intersection marker. So it is really important that you test and make sure you can see the green of the course you will be using.
If you are using the EV3 sensor in RGB mode, you can decide what range of colours is green yourself and make it very flexible, handling many shades. You can either use fixed ranges such as:
- (Red > R1 and Red < R2) and (Green > G1 and Green < G2) and (Blue > B1 and Blue < B2)
where you decide on the constant values for R1, R2, G1, G2 B1 and B2.
Or, if you are using the normalizing method discussed in the article: #Robotics Programming a Self Calibrating Line Following Robot, you can use a relative approach where you can look for a higher green value than red or blue by a certain percentage (say 10%), for example:
- (Green > Red + 10) and (Green > Blue + 10)
Whatever method you use, test it on a variety of green shades and make sure it does not give false positives when the sensors are over other colours or the silver strip.
More Information
For more information on robotics and the EV3 Basic extensions to Microsoft Small Basic, check out the following links:
Hope you find this information useful.
David
This article was originally posted on http://www.winthropdc.com/blog.

Thanks you Very much!
LikeLike